HOW TO REPAIR STUCCO CRACKS
Small, thin cracks in your stucco can be easily fixed with exterior latex paintable caulk. Choose a caulk color that is close to your stucco color. You may not find an exact match, but something close to it. If need be, you can touch up the caulked area with an exterior paint that matches your stucco color. Use a utility knife to cut the nozzle at a 45-degree angle, and place it in a caulking gun. Puncture the internal foil patch at the base of the nozzle with a nail or other slender sharp object. Hold the caulking gun at a 45-degree angle parallel to the crack being filled and pull the nozzle along the crack. Don’t push it. Position the nozzle opening so that it forces sealant onto the crack. As you finish applying each bead of caulk, release the trigger and pull back on the caulking gun rod to stop the flow of caulk and relieve the pressure inside the tube. Releasing the trigger alone will not stop the caulk from flowing out of the nozzle. Let the caulk set for the manufacturer-recommended amount of time.
For cracks larger than a ¼” or so, fill the crack with premixed stucco patch and a small putty knife. Allow the stucco patch to set for the a mount of time recommended by the manufacturer. You may need to apply a few layers of the stucco patch to adequately fill the crack and make the patch flush with the surrounding stucco surface. Follow all instructions.
HOW TO REPAIR STUCCO HOLES
- Step 1: Remove Broken and Crumbling Stucco
- Step 2: Inspect/Replace Metal Mesh
- Step 3: Mix Batch of Stucco
- Step 4: Apply Stucco
- Step 5. Paint (Optional)

Repairing Stucco Cracks
Cracks in stucco are a common problem. Stucco, after all, is not very resilient–it’s made of cement. So when a house settles over time or shifts because of heavy winds or earthquakes, the stucco siding cracks. The proper way to repair these problems depends upon their size.
Hairline Cracks
Very fine, hairline cracks are very easy to fix. If they are super-thin, a coating of acrylic latex paint that matches the siding will probably do the job. If they are a little too wide for paint to fill the crevices, fill them with latex caulking compound first. Allow this to dry thoroughly, then paint the surface with acrylic latex paint.
REPAIRING & SEALING CRACKS & HOLES IN STUCCO
Project Instructions
- Widen the crack to a minimum of 1/4 inch using a chisel and hammer (the edges of the crack should be vertical or beveled in an inverted “V”).
- Break away any deteriorating concrete and remove loose material with a brush.
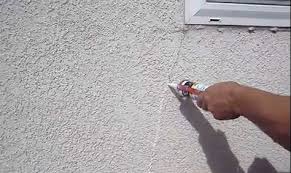
- Cut the nozzle tip of the QUIKRETE Stucco Repair on an angle with a utility knife to match the width of the crack and load into a standard caulk gun.
- Slowly draw the gun down the crack forcing a bead of stucco repair caulk deep into the
Pre-Mixed Stucco Patch
- Stir the pre-mixed stucco using a margin trowel or putty knife.
- Spread and texture the concrete patch to match the surrounding stucco – wet the trowel to achieve a smooth finish.
NOTE: for patches or cracks over 1/4 inch thick pre-mixed stucco patch should be applied in multiple layers, allowing each layer to dry before applying the next.
Stucco can and should be sealed properly to prevent moisture intrusion.
If new, stucco can be sealed with a clear concrete/ masonry sealer, which will penetrate into the stucco and stop moisture entrance. These are typically silicone type sealers. While effective, these finishes will usually need to be redone every 4-5 years. Redoing sealing on a regular basis is what prevents deterioration and damage, which can lead to the need for full replacement.
If the stucco is older and has already developed cracking, an elastomeric coating would be a best choice. These finishes are waterproof, seal hairline cracks, and are extremely pliable and flexible. If cracks develop below these coatings, the finish will stretch and bridge the crack, and help keep waterproof. As importantly, these finishes are microporous; they will breath to allow moisture vapor behind it to properly escape without bubbling and blistering. When properly done, elastomeric coatings can easily last 10 or more years.
Of course, after the execution of elastomeric coatings, the best way to get the most value out of such an installation is to stay on top of your stucco maintenance regularly performing the tasks required to keep your stucco in top condition.
Common Causes of Stucco Water Damage
Stucco damage is often caused by water. If you noticed that your stucco walls have blistering, staining, or mold, you could have water damage. Stucco siding is vulnerable to a multitude of issues that can cost you thousands of dollars. Here are the four common causes of stucco water damage.
Hydraulic Pressure
Hydraulic pressure happens when water moves from behind the stucco wall. It can result in blooming and eventually blistering. To avoid stucco damage, a moisture barrier will need to be constructed that has an efficient drainage. This enables water to travel from behind the wall instead of accumulating and causing damage. Additionally, you should avoid painting retaining walls since there’s a heightened risk of blistering. If you have this issue, you will need to have water removal in Alpharetta.
Wicking
Wicking happens when moisture is consumed into the stucco wall’s plaster. It can result in blistering, staining, and efflorescence. If this occurs, it was most likely caused by a deficient weep screed or poor installation. A weep screed is situated between the moisture barrier and the surface of the stucco. When the moisture travels through the stucco surface, the water flows down the screed and exits through the weep holes. If a weep screed is non-existent, then the walls can easily be damaged if they are plastered all the way to the ground.
Surface Moisture
Many homes have flower beds that surround the base of the house. If you use sprinklers in your flower beds, you must ensure that the sprinklers were properly installed. When sprinklers aren’t properly installed, they can spray water directly onto the base of the walls. This can cause efflorescence and potentially blistering. Under some circumstances, a paper moisture barrier is damaged and is unsuccessful with keeping moisture away from the walls, which can cause mold to develop.